Effective Techniques for Tinning a Soldering Iron
Tinning your soldering iron is an essential step for anyone looking to work with electronics effectively. It involves coating the tip of the soldering iron with a layer of solder, which helps improve heat transfer and prolongs the life of the tip. Here, we will explore the best techniques to tin your soldering iron efficiently.
Step 1: Gather Your Materials
Before you begin, make sure you have the following materials:
- A soldering iron
- Solder (preferably rosin-core solder)
- A damp sponge or brass sponge
- A heat-resistant mat or surface
Step 2: Prepare Your Soldering Iron
Start by plugging in your soldering iron and allowing it to heat up for about 5-10 minutes. A properly heated iron will allow the solder to melt easily, ensuring an efficient tinning process. While waiting, prepare your workspace by laying down your heat-resistant mat and having your sponge nearby.
Step 3: Clean the Tip
A clean tip is crucial for effective tinning. After the iron has warmed up, use the damp sponge or brass sponge to wipe away any old solder or oxidation from the tip. This action will help to remove impurities, allowing new solder to adhere better. If there is stubborn oxidization, avoid scraping the tip with a metal object as this can damage it. Instead, repeat the cleaning process until you see a shiny surface.
Step 4: Apply Flux (Optional)
While not necessary, applying a small amount of flux to the tip can enhance solder adhesion. Flux helps to prevent oxidation and allows for better flow. If you choose to use flux, simply apply a tiny amount to the tip before moving on to the next step.
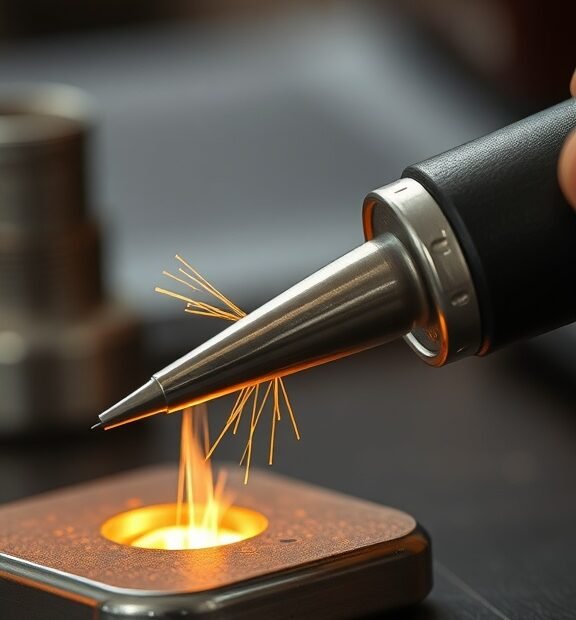
Step 5: Tin the Soldering Iron
With a clean tip and optional flux applied, it’s time to tin your soldering iron:
- Touch the solder wire to the tip of the iron.
- Allow the solder to melt and coat the tip evenly.
- Once covered, remove the solder wire and inspect the tip.
- If the solder has not coated evenly, repeat the process until you achieve a shiny, even layer.
This layer of solder should look smooth, not dull or clumpy, as a shiny coating indicates proper tinning.
Step 6: Maintain Your Tip
Tinning should not only be a one-time task; it’s crucial to maintain your soldering iron tip regularly. After using your soldering iron, remember to clean it with the damp sponge and re-tin the tip before storing it. This practice protects the tip from oxidizing and ensures it is always ready for the next use. If you notice any build-up, clean it off before applying more solder.
Common Mistakes to Avoid
While tinning your soldering iron, steer clear of these common mistakes:
- Using the wrong type of solder: Always use rosin-core solder, which is specifically designed for electronics.
- Overheating the tip: Excessive heat can cause damage, so make sure to work at the right temperature.
- Neglecting maintenance: Failing to clean and re-tin regularly can severely impact the performance of your soldering iron.
Understanding the Benefits of Tinning
Tinning your soldering iron not only enhances its performance but also contributes to better solder joint quality. A well-tinned tip provides improved thermal conductivity, resulting in quicker soldering times and cleaner connections. Moreover, regular tinning prolongs the life of your soldering tip, saving you money in the long run.
By following these effective techniques, you’ll ensure that your soldering iron remains in excellent condition, enabling you to tackle all your electronic projects more confidently. Happy soldering!
Common Mistakes to Avoid When Tinning a Soldering Iron
Tinning a soldering iron is an essential skill for anyone who works with electronics. It helps to ensure a proper connection and extends the life of your soldering tip. However, many beginners encounter common mistakes during this process. Being aware of these pitfalls can help you achieve better results and make your soldering experience smoother.
One of the most frequent mistakes is failing to clean the soldering iron before tinning. When you take your soldering iron out of the box or after using it, the tip can have residue that interferes with the tinning process. Always start with a clean tip. Use a damp sponge or brass wool to remove any oxidation or old solder before you apply new solder. This step is essential because it allows the new solder to adhere properly to the tip.
Another mistake is using the wrong type of solder. Not all solder is created equal, and using a solder that isn’t suitable for your project can lead to numerous issues. Always choose rosin-core solder for electronics. This type contains a flux that improves the flow and bonding of the solder. Avoid using solder with a higher lead content than what is necessary for your project, as it may create health hazards and lead to dirty connections.
When applying solder to the iron tip, it’s important to use the right amount. A common error is over-tinning or under-tinning the tip. If you over-tin, excess solder can drip off the tip, creating an unmanageable mess. On the other hand, under-tinning can lead to poor heat transfer and inefficient soldering. Aim for a thin, even layer of solder that covers the tip but doesn’t form drops.
Temperature control plays a crucial role in tinning. Many new users make the mistake of using a temperature that is too high or too low. A temperature that is too high can burn the solder and lead to a damaged iron tip, while too low a temperature may not melt the solder effectively, preventing it from sticking. The ideal temperature for tinning is generally around 350°C (662°F). Always preheat your soldering iron to the right temperature before beginning the tinning process.
Additionally, timing is important when tinning your soldering iron. You should allow the solder to melt completely and flow onto the tip without rushing the process. Applying too much pressure or moving the soldering iron too quickly can hinder the proper bonding of solder, leaving you with a poorly tinned tip. Give it a few moments so the solder can coat the tip evenly.
Improper storage of your soldering iron after use is another common mistake. After tinning, it’s vital to always store the soldering iron with a bit of solder still on the tip. This helps prevent oxidation and keeps the tip clean for the next use. Never leave it bare or turned off with a cold tip, as that can lead to easy degradation.
Here are some quick tips to remember when tinning your soldering iron:
- Clean the tip before tinning.
- Use rosin-core solder specifically designed for electronics.
- Aim for a thin layer of solder on the tip.
- Maintain the right temperature for soldering.
- Be patient and allow the solder to melt and flow.
- Store your soldering iron properly after use.
Ask for help or refer to guides whenever you feel unsure. Soldering is a skill that takes practice to perfect, and everyone makes mistakes along the way. Take your time, and be willing to learn from your experiences. The more you practice tinning your soldering iron correctly, the better your overall soldering projects will be. Embrace the journey of learning, and you will find soldering becomes an enjoyable task rather than a daunting chore.
Conclusion
Tinning a soldering iron is an essential skill that can significantly enhance your soldering experience and results. By using effective techniques, such as properly cleaning the tip, applying the right amount of solder, and ensuring the right temperature, you can achieve a well-tinned iron that promotes better heat transfer and prevents oxidation. A key takeaway is to prioritize quality over quantity; using a small amount of high-quality solder will usually yield better results than overwhelming the tip with excess material.
Avoiding common mistakes is just as crucial as mastering effective techniques. Many beginners tend to overheat the soldering iron, which can damage the tip and lead to poor solder joints. Others might neglect routine maintenance, resulting in oxidization that hampers performance. By addressing these pitfalls—such as ensuring a clean tip before use and regularly re-tinning your iron—you’ll not only extend the life of your tool but also improve your overall soldering skills.
Remember, a well-tinned soldering iron is your best ally. It enhances your ability to create strong, reliable connections, which is what every successful project demands. Whether you’re a hobbyist or a professional, taking the time to properly tin your soldering iron can save you frustration and improve the quality of your work. Keeping these insights in mind will make your soldering tasks smoother and more enjoyable. Happy soldering!