Step-by-Step Guide on How to Solder SMD Components with a Soldering Iron
Soldering SMD (Surface Mount Device) components can seem daunting, but with the right approach and tools, you can master this technique. This guide provides a detailed, step-by-step process on how to solder SMD components with a soldering iron effectively.
Gather Your Tools and Materials
Before starting, it’s crucial to have all your tools and materials prepared. Here’s what you will need:
- Soldering iron with a fine tip
- Solder (preferably lead-free)
- Flux (for better solder flow)
- Tweezers
- PCB (printed circuit board) with SMD pads
- Magnifying glass or microscope (optional, but helpful)
- Solder wick or desoldering pump (for corrections)
- Wire cutters
Prepare Your Work Area
Creating a clean and organized workspace is essential. Find a flat surface well-lit with adequate ventilation. Use an anti-static mat if possible to protect sensitive components from static damage.
Positioning the SMD Component
Carefully take your SMD component with tweezers. Align it over the pads on the PCB where it will be soldered. Ensure that the orientation matches the design—pay attention to the polarity markings if applicable.
Applying Flux
Before soldering, apply a small amount of flux to the pads on the PCB. This helps the solder flow more easily and creates a reliable connection.
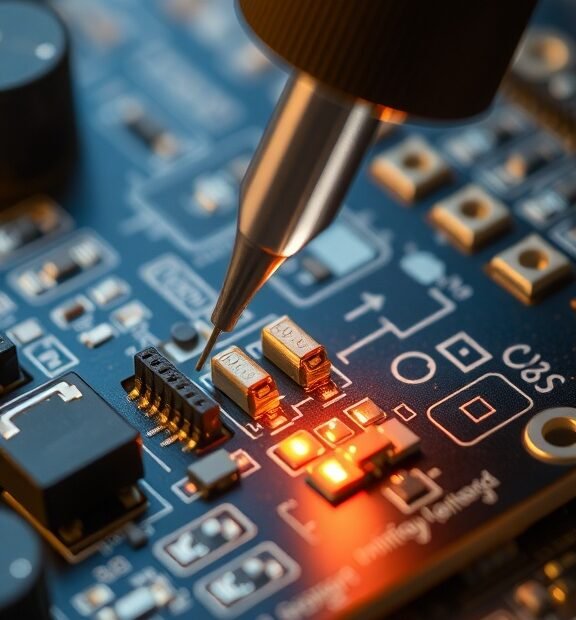
Starting the Soldering Process
Here’s a step-by-step approach to soldering:
- Heat the Soldering Iron: Turn on your soldering iron and let it heat to around 350°C (662°F).
- Apply Solder to the Joint: Touch the tip of the soldering iron to one of the component leads and the pad on the PCB simultaneously to heat them. Quickly feed solder into the joint. Remove the solder and then the iron.
- Check the Joint: You should see a shiny solder joint. It should be around the lead and smoothly connect to the pad. If it looks dull or has a ball shape, it may need rework.
Securing Additional Leads
Once one lead is soldered, you can gently lift the component with tweezers to align the other pins correctly. Repeat the soldering process for the remaining leads by following the same steps. Always ensure you are working efficiently, as excessive heat can damage both the component and board.
Handling Excess Solder
If you notice any excess solder or bridges between pads, use solder wick or a desoldering pump to correct it:
- Place the solder wick over the excess solder.
- Heat the solder wick with the soldering iron.
- The solder will be absorbed into the wick.
Final Inspection
Once you have soldered all the leads, inspect your work. Look for the following:
- Shiny connections without any bumps or bridges
- Properly aligned components on the PCB
- No stray solder on nearby pads
Use a magnifying glass if necessary to check the joints closely.
Testing Your Work
After soldering, connect the PCB to a power source or test equipment to ensure everything functions correctly. Check for stability and the absence of shorts or faults.
Cleaning Up
Clean the area around your solder joints. You can use isopropyl alcohol and a small brush to remove any flux residue. Keeping your PCB clean improves both aesthetics and performance.
By following these steps, you can confidently solder SMD components using a soldering iron. With practice, you’ll become more proficient in handling these tiny parts, leading to cleaner and more professional results.
Common Mistakes to Avoid When Soldering SMD Components
Soldering surface-mount devices (SMD) can be challenging, especially for beginners. Many hobbyists and professionals alike make common mistakes that can lead to soldering failures. Identifying and avoiding these pitfalls will help improve your skills and ensure successful soldering of SMD components.
Using the Wrong Solder
One of the first mistakes to avoid is selecting inappropriate solder for your project. For SMD components, a rosin core solder is often recommended. This type of solder is easy to work with and provides a good connection. Ensure you use a diameter that fits the application’s needs; typically, a thinner solder (0.5mm or 0.6mm) works well for SMD soldering.
Poor Iron Temperature Management
Managing the temperature of your soldering iron is crucial. If the temperature is too low, the solder won’t flow properly, leading to weak joints. On the flip side, if it’s too hot, you risk damaging sensitive components. Ideally, set your soldering iron to around 350°C (662°F). Always remember to preheat your board if necessary.
Improper Tip Use
The soldering iron tip plays a significant role in successful soldering. Using a tip that is too large can make it hard to apply solder precisely. Conversely, a tip that’s too small may not transfer enough heat to solder effectively. Ensure you choose a tip that fits the size of the SMD component and surface.
Inadequate Solder Application
Applying too little solder can lead to weak connections, while too much may create solder bridges, causing short circuits. Here are some tips to manage solder application effectively:
- Heat both the pad and the component lead before adding solder.
- Apply just a small amount of solder to the joint; it should be shiny and fillet-like.
- Ensure the solder flows evenly around the joint without excess.
Not Using Flux
Flux helps the solder flow and adhere better to the materials. Skipping this vital step can lead to poor solder joints. Apply a small amount of flux before soldering, especially on the pads where the component will sit. This will create a better contact surface and enhance the solder’s effectiveness.
Ignoring the Layout
Always pay attention to the layout of your PCB when soldering SMD components. Misplacing a component can lead to functional issues or damage. Double-check the component orientation and pin numbering before starting. If you’re using a complex PCB, consider using a magnifier to assist you in seeing the details clearly.
Forgetting to Clean the Board
After soldering, cleaning the board may get overlooked, but it’s essential for the long-term performance of your circuit. Residues from solder and flux can cause corrosion over time. Use isopropyl alcohol and a lint-free cloth or brush to clean the PCB gently, ensuring all residues are removed.
Failure to Inspect Joints
Once you’ve done your soldering, it’s critical to inspect the joints you’ve created. Failing to do a careful inspection can lead to undetected issues that might cause malfunction down the line. Look for the following:
- Shiny and smooth joints, indicating proper solder flow.
- No visible gaps between the component lead and pad.
- No solder bridges connecting adjacent pads.
Setting Aside Safety Precautions
Safety should never be taken lightly in soldering. Always wear safety glasses to protect your eyes from solder splashes and fumes. Working in a well-ventilated area will help mitigate inhalation of harmful fumes. make sure you are aware of your workspace—soldering irons can be extremely hot, so take precautions to avoid burns or injuries.
By being aware of these common mistakes and taking steps to avoid them, you will not only improve your soldering skills but also enhance the reliability of your SMD soldering projects. Happy soldering!
Conclusion
Successfully soldering SMD components with a soldering iron is a valuable skill that enhances your electronics projects. By following the step-by-step guide outlined earlier, you can achieve precise and reliable connections. Remember to prepare your workspace, use the correct tools, and apply the right techniques. With practice, you’ll become confident in handling various SMD components.
Mistakes can happen, but knowing what to avoid will significantly improve your soldering experience. Steer clear of using too much solder, which can cause bridges between pads. Focus on heating the pad and component lead properly without overheating. Don’t forget to clean your soldering iron tip regularly to maintain optimal performance. Familiarizing yourself with the common pitfalls will help you work more efficiently and produce higher-quality results.
As you embark on your soldering journey, be patient and give yourself the time to learn. Each project will teach you something new, and soon enough, you will be soldering SMD components like a pro. So gather your tools and start experimenting; with each solder joint, you’re building not only circuits but also your expertise. Remember, practice makes perfect. Happy soldering!