Techniques for Effective Soldering of Silver with a Soldering Iron
Soldering silver can seem intimidating at first, but with the right techniques, you can master the skill and create beautiful metalwork projects. This guide will walk you through essential techniques for effective soldering of silver using a soldering iron.
To start, ensure you have the right tools. Here’s what you need:
- A quality soldering iron with a fine tip
- Silver solder (choose the appropriate type: easy, medium, or hard)
- Flux specifically designed for silver soldering
- Cleaning tools (like a brass brush or steel wool)
- Safety equipment (such as goggles and a mask)
- Work surface that can withstand heat
Before you begin soldering, preparation is key. Start by cleaning the pieces you plan to join. Silver must be free from dirt, grease, and oxidation to ensure a strong bond. Use the cleaning tools to scrub the surfaces thoroughly. After cleaning, apply flux to the areas where you will apply the solder. Flux acts as a protector during the heating process, preventing oxidation and allowing the solder to flow smoothly.
Next, set up your workspace. Ensure you have adequate lighting and a heat-resistant surface. Place your silver pieces in the desired position. You can use a third hand tool or clamps to hold everything steady during the process. This setup prevents movement and ensures precision.
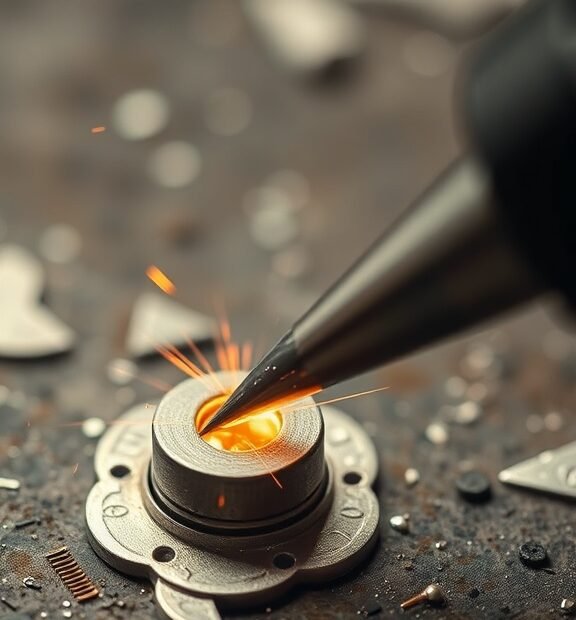
Heat your soldering iron to the appropriate temperature, usually around 350°C to 400°C (662°F to 752°F). You want it hot enough to melt the solder without damaging your silver. Always test the temperature on a scrap piece of silver if you’re unsure.
When you apply heat to your silver pieces, place the tip of the soldering iron directly on the metal where the joint is. Hold it there for a few seconds to allow the silver to heat up evenly. Avoid overheating, as this can cause the silver to warp or burn. Once the silver reaches the right temperature, take your solder and touch it to the joint. If done correctly, the solder should melt quickly and flow into the seam.
Watch how the solder spreads. If it doesn’t flow smoothly, you may need to increase the heat slightly or reposition the soldering iron. Moreover, always remember to apply solder sparingly. Too much solder can lead to unsightly blobs, which are not only visually unappealing but can also weaken the joint.
After you have applied the solder, remove the heat and allow the assembly to cool naturally. Do not cool down the joint quickly by dousing it in water, as this can lead to cracks due to rapid temperature changes. Instead, let the piece air cool for better results.
Once your silver is cool, examine the joint. Proper soldering should leave a clean, shiny seam. If you identify any excess solder or rough spots, these can be sanded or polished away. A small file or sanding tool can help create a smooth finish, making your work look professional.
Cleaning the piece afterward is crucial. Use mild soap and water to wash off any remaining flux. Flux residue can lead to tarnishing over time if not removed. After washing, dry the piece thoroughly to prevent water spots.
Practice makes perfect. The more you experiment with soldering, the more confident you will become. Don’t get discouraged by initial mistakes; instead, treat them as learning opportunities. Try different techniques and practice on scrap pieces until you feel comfortable tackling your main projects.
Effective soldering of silver with a soldering iron hinges on proper preparation, technique, and practice. As you become more familiar with these methods, you will not only improve your soldering skills but also increase your enjoyment of metalworking. With patience and perseverance, your silver soldering projects will look exquisite, showcasing your hard work and dedication.
Common Mistakes to Avoid When Soldering Silver Jewelry
Soldering silver jewelry can be a rewarding craft, but it comes with its own set of challenges. If you’re new to this technique or looking to refine your skills, being aware of common mistakes is crucial. Avoiding these pitfalls will not only enhance the quality of your work but also make the process more enjoyable. Here are some common mistakes to steer clear of when soldering silver jewelry.
Using the Wrong Type of Solder
One of the most frequent mistakes beginners make is choosing the wrong type of solder. There are three main types of solder: easy, medium, and hard. The selection depends on the project and the metal thickness. For thin pieces, easy solder is best as it melts at a lower temperature, reducing the risk of damaging the silver. Always familiarize yourself with the type of solder that complements your designs.
Neglecting Surface Preparation
Before you begin soldering, ensuring that the surfaces you’re joining are clean is essential. Residue from oils, oxidation, or dirt can interfere with the soldering process. Use a fine file or sandpaper to prepare the metal, and consider using a pickle solution to remove oxidation. An adequately prepared surface will promote better adhesion and a stronger bond.
Overheating the Silver
Applying too much heat is a common mistake that can lead to melting and warping of your silver jewelry. It’s important to heat the workpiece evenly and gradually. The ideal temperature should allow the solder to flow while keeping the rest of the piece intact. Move the flame consistently to avoid hot spots that could damage your creation.
Ignoring Safety Precautions
Soldering can expose you to fumes and high temperatures, so safety should be your top priority. Wear a mask if you are using flux that produces harmful fumes, and make sure your workspace is well-ventilated. Additionally, use safety goggles to protect your eyes from flux, solder, or any flying debris. Remember, taking the right precautions will help you enjoy the process while staying healthy.
Using Too Much Flux
Flux is crucial in the soldering process as it cleans the metal and helps the solder flow. However, using too much flux can cause unsightly residues and can even result in weak joints. Aim to apply a thin, even layer of flux to the surfaces you are soldering. A little goes a long way, and it’s often easier to add more if needed than to remove excess.
Skipping the Pre-Fitting Stage
Before you solder, always pre-fit your pieces. This means ensuring that everything lines up correctly without solder. Skipping this step could result in misaligned parts, leading to wasted time and materials. Take your time during this phase – it can save you a lot of hassle later on.
Not Visualizing Heat Flow
Many beginners make the mistake of not considering how heat flows when soldering. The heat will travel to the areas that need it most, so it’s essential to position your torch or soldering iron strategically. If you apply heat to the solder directly, it may not effectively melt onto the joints. Instead, focus on heating the metal parts adjacent to the solder joint to allow the solder to flow where it’s needed.
Neglecting to Test the Joint Strength
After soldering, it’s easy to assume that everything is solid just because it looks good. Always test the strength of your joints gently before proceeding with the finishing steps of your project. A simple tug or pull can help you identify weak areas. This step is crucial, especially if your piece will be subjected to wear and tear later on.
Rushing the Process
One of the biggest mistakes you can make when soldering silver jewelry is rushing. Soldering takes patience and practice. Take your time throughout each step of the process – from preparation to soldering to finishing. Rushing can lead to errors, which can be costly in terms of time and materials.
By avoiding these common mistakes, you can improve your silver soldering skills and create pieces that are not only beautiful but also durable. Remember to take your time, pay attention to detail, and always be willing to learn from your experiences.
Conclusion
Successfully soldering silver with a soldering iron requires a combination of proper techniques and an awareness of common pitfalls. To achieve a strong bond, it’s essential to start with clean surfaces. Ensure that both pieces to be joined are free from dirt and oxidation — cleaning with a file or appropriate solvent can work wonders. Using the right heat setting on your soldering iron will also make a difference. Too hot, and you risk melting or warping your silver; too cool, and the solder won’t flow properly.
A vital technique involves applying flux to facilitate the flow of solder, which helps prevent oxidation during the process. When you heat the silver, focus on the joint area to ensure even heating; this promotes an even melt. Don’t forget that patience is key. Rushing through soldering can lead to misalignment or incomplete bonds.
As you hone your soldering skills, being mindful of common mistakes is equally important. Avoid overheating, as this is one of the most frequent errors that can damage your work. Additionally, using too much solder or poorly preparing your silver pieces can sabotage your efforts, leading to weak joints.
By practicing these techniques and steering clear of common missteps, you can effectively solder silver with confidence. Each project offers an opportunity to refine your skills and learn more about the art of soldering. Embrace the learning process, and remember, the key to success lies in preparation, patience, and practice. Your journey in creating beautiful silver jewelry will not only enhance your craftsmanship but also bring your creative visions to life with stunning results.