Can You Solder Brass with a Soldering Iron: Techniques and Tips
Brass is a popular metal used in a variety of applications, including plumbing fixtures, musical instruments, and decorative items. If you’re wondering whether you can solder brass with a soldering iron, the answer is yes. However, there are some important techniques and tips to keep in mind to ensure a successful soldering project.
To solder brass properly, it’s essential to understand a few key points about the material and the soldering process. Brass is an alloy made primarily of copper and zinc, which means it has different melting points compared to other metals. The melting point of brass can range from 900°F to 1,650°F depending on its specific composition. This makes it crucial to use the right soldering techniques and tools to achieve a strong bond without damaging the brass.
Here are some crucial techniques and tips for soldering brass successfully with a soldering iron:
- Select the Right Solder: When soldering brass, choose a solder that is compatible with both copper and zinc. Lead-free solder is often recommended for safety and is widely available. 60/40 tin-lead solder also works well if you do not have concerns about lead content.
- Use Flux: Applying flux is critical when soldering brass. Flux helps remove oxidation from the surface of the brass and improves the flow of solder. Be sure to use a flux that is designed specifically for metal soldering.
- Prepare the Surface: Before starting, clean the surface of the brass pieces you want to solder. Use sandpaper or a wire brush to remove any grime, oxidation, or oils. A clean surface allows for better adhesion of the solder.
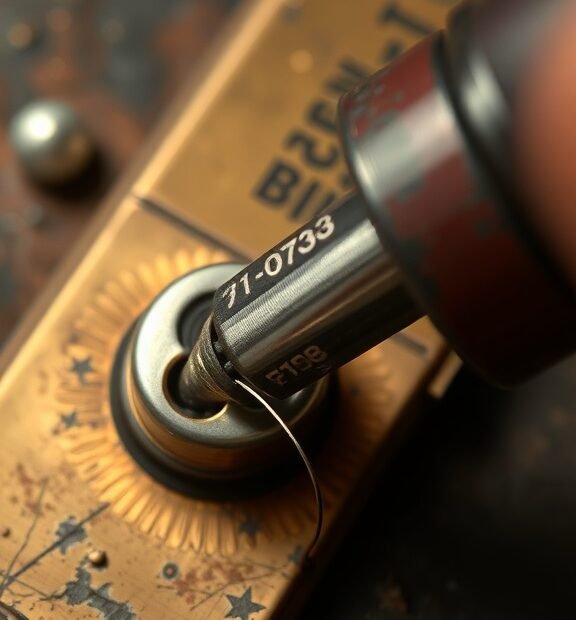
- Heat the Brass Properly: Instead of directly heating the solder, focus on heating the brass itself. A soldering iron can take some time to heat the brass to the appropriate temperature. When the brass is heated, the solder will flow more easily into the joint.
- Work Quickly: Once the brass is heated, apply the solder quickly to avoid overheating the brass. If the metal gets too hot, it can warp or discolor, affecting the overall appearance and effectiveness of the solder joint.
It’s also important to have the right tools on hand. Using a soldering iron with a fine tip can allow for precision when soldering smaller pieces of brass. For larger areas, consider a soldering iron that delivers more power (at least 100 watts) to ensure quicker heating. Be mindful of the wattage as a too low wattage may lead to insufficient heat transfer, causing complications.
Another helpful tip is to use a pair of tweezers or a vice to hold the brass pieces together. This not only helps keep your hands free but also ensures that the parts stay aligned while you work. Choosing the right workspace is important too. Make sure to have proper ventilation and use a surface that can withstand high temperatures when soldering. A heat-resistant mat can protect your work area from any accidental burns.
You can also experiment with different soldering techniques. For instance, using a technique called “tinning” involves pre-tinning the brass surfaces before joining them. To do this, apply flux, heat the brass, and then introduce solder to the surface. This can enhance the bond and make the final joint stronger.
When you finish, allow the joint to cool naturally. Don’t rush it by applying cold water, as this can lead to cracking or other issues. If any excess solder is visible, you might want to trim it gently with a file for a professional finish.
To maintain the integrity of your solder joint, it’s also wise to provide some protection against corrosion. Clear lacquers or special finishing paints designed for metals can be applied to help protect the brass. Regular maintenance checks will ensure longevity and aesthetic appeal.
Soldering brass with a soldering iron is definitely possible, but it requires careful technique and the right approach. By following these tips and techniques, you can successfully create strong solder joints on brass pieces for your projects. Happy soldering!
Comparing Soldering Methods for Brass and Other Metals
Soldering is an essential skill for many DIY projects, especially when dealing with metals like brass and others. If you’re considering soldering brass, it’s important to understand how it compares to other metal soldering methods.
The Basics of Soldering Brass
Brass, an alloy of copper and zinc, is known for its excellent corrosion resistance and workability. When soldering brass, you’ll generally need a high-temperature soldering method due to its melting point, which is higher than many other metals. Here are key aspects you should consider:
- Temperature Requirements: Soldering brass requires a soldering iron or torch that can reach temperatures of at least 650°F (343°C).
- Solder Composition: Use rosin-core solder with high copper content, typically around 60/40 (tin to lead) or a lead-free option, which is ideal for brass.
- Flux Usage: A proper flux is vital to prevent oxidation during the soldering process. Consider using a flux specifically meant for brass.
Comparing Soldering Techniques
When it comes to soldering brass versus other metals like copper or aluminum, different techniques and materials can affect the overall outcome. Let’s explore how these methods vary.
1. Soldering Copper
Copper has a relatively lower melting point than brass, making soldering copper a bit easier. You can use similar solders, but copper requires less heat and can use different types of flux, including water-soluble options.
2. Soldering Aluminum
Aluminum is a bit trickier to solder. Unlike brass and copper, aluminum creates an oxide layer that hinders solder adherence. You must use a special aluminum soldering technique and a specific flux designed to break through this barrier. A high-temperature soldering gun or propane torch is often necessary.
3. Soldering Stainless Steel
Stainless steel involves using solder with nickel or silver content, which requires high temperatures for effective bonding. It’s not the easiest metal to solder, as the smooth surface can make it difficult for solder to adhere without a proper flux.
Tools You Need
For successful soldering, having the right tools is essential. Here’s a quick list of what you’ll need:
- Soldering Iron or Torch
- High-temp Solder
- Flux
- Soldering Stand
- Wire and Wire Cutters
- Safety Glasses
Common Mistakes to Avoid
When soldering brass or any other metal, it’s easy to make mistakes that can ruin your project. Here are a few common pitfalls to watch out for:
- Insufficient Heating: Ensure your soldering iron or torch is hot enough, or the solder won’t flow correctly.
- Skipping Flux: Never skip using flux; it’s essential for preventing oxidation and ensuring a strong bond.
- Not Cleaning the Surface: Make sure the surfaces you’re soldering are clean and free of dirt or oils.
Understanding Different Soldering Forms
There are various types of solder available based on your material needs. Here’s a brief overview:
- Lead-Based Solder: Traditionally used due to its low melting point, but less common today due to health concerns.
- Lead-Free Solder: An eco-friendly alternative, often made of tin, copper, and other metals.
- Silver Solder: Good for creating strong joints with higher temperatures, recommended for brass.
Ultimately, soldering brass does require specific techniques and tools. By understanding how brass compares to other metals, you can effectively tackle your project with confidence. Whether you’re a novice or have some experience, mastering these soldering methods will enhance your skills and expand your capabilities in metalwork.
Conclusion
Soldering brass with a soldering iron is a practical skill that offers numerous benefits, especially for those tackling small projects or repairs. By understanding specific techniques, such as using the right solder and ensuring proper surface preparation, you can achieve strong and reliable joint connections. The unique properties of brass require a tailored approach compared to other metals, making it essential to adapt your soldering methods accordingly.
When comparing soldering brass to other metals, it’s clear that each material presents its own challenges and advantages. For instance, while soldering copper or silver may require different temperatures and solder types, brass’s durability and corrosion resistance make it a popular choice for various applications. Familiarizing yourself with these distinctions not only enhances your soldering skills but also encourages confidence when handling different projects.
Ultimately, whether you’re a beginner or someone with soldering experience, mastering the art of soldering brass with a soldering iron paves the way for successful results. By incorporating the techniques and tips discussed, you’ll be well on your way to creating sturdy and aesthetically pleasing joints, ensuring your projects stand the test of time. Embrace the opportunity to learn and explore different soldering methods, as this knowledge will serve you well in all your metalworking endeavors. Remember, practice makes perfect, and each soldering experience brings you closer to becoming a proficient metalworker. Happy soldering!