Mastering the Basics: How to Solder with a Soldering Iron for Beginners
Soldering is an essential skill for anyone interested in electronics or crafting. If you’re just starting out, learning how to solder with a soldering iron can seem daunting. But don’t worry! With the right techniques and tools, you’ll become a pro in no time. Here’s a step-by-step guide to help you master this useful skill.
Before you get started, you’ll need to gather a few tools and materials. These include:
- A soldering iron
- Solder wire (preferably rosin-core)
- A soldering iron stand
- Soldering sponge or damp cloth
- Wire cutters and strippers
- Safety goggles
- Your project pieces (e.g., wires, components)
Safety should always come first when you’re working with a soldering iron. Always wear safety goggles to protect your eyes from any splashes of molten solder. Also, ensure you work in a well-ventilated area to avoid inhaling any fumes.
Soldering Stations | Easy 60 Day Return
Once you have all your materials ready, it’s time to prepare your workspace. Place your soldering iron in its stand and plug it in. Allow it to heat up for about 5-10 minutes. The tip of the iron should be clean for effective soldering, so if necessary, wipe it on a damp sponge to remove any residue.
Next, let’s prepare the pieces you want to solder. If you’re working with wires, strip about 1/2 inch of insulation off the ends. Twist the wires together neatly if connecting two wires. If you’re soldering electronic components to a circuit board, ensure the leads of the components are through the board holes appropriately.
Soldering Stations | Easy 60 Day Return
Now, it’s time to solder! Here’s a simple step-by-step process to follow:
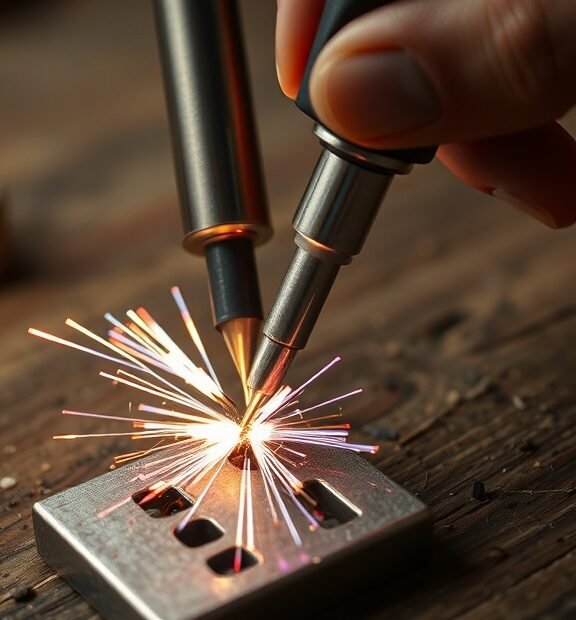
- Heat the Connection: Place the tip of the soldering iron onto the joint where the pieces meet. Keep it there for a second or two. Allow the metal to heat up.
- Apply Solder: With the soldering iron still on the joint, feed the solder wire into the connection. The solder should flow smoothly around the metal parts. Remove the solder wire first, then the soldering iron.
- Let It Cool: Allow the solder joint to cool for a few seconds. Don’t move the joint while cooling. You should see a shiny, smooth finish when it’s done!
Practice makes perfect! Start with simple projects, like connecting two wires or attaching components to a circuit board. Ensure you keep your soldering iron tip clean during use; a dirty tip can lead to poor connections. If needed, clean it again on the damp sponge.
Soldering Stations | Easy 60 Day Return
As you gain confidence, try more complex projects. Keep in mind the types of solder you might explore as you progress. There are lead-free and lead-based solders, and each has its own melting point and suitable applications.
Some tips to keep in mind while you’re learning:
Soldering Stations | Easy 60 Day Return
- Avoid using too much solder. A good solder joint should have a small amount that forms a neat fillet around the connection.
- If you make a mistake, don’t worry. You can heat the solder joint again and use solder wick to absorb excess solder.
- Invest in a good quality soldering iron that has adjustable temperatures for different soldering tasks.
- Practice on scrap materials before moving on to your actual project. This will help you refine your technique.
Once you feel comfortable soldering, you might want to explore other techniques such as desoldering. This skill is equally important for fixing mistakes and replacing components. With your newfound skills in soldering, you’ll be ready for a variety of electronics projects!
Learning how to solder with a soldering iron involves practice, patience, and safety. By mastering the basic techniques outlined above, you’ll set yourself on a path toward becoming a competent solderer. So gather your tools, keep practicing, and enjoy the world of soldering!
Common Mistakes to Avoid When Soldering Electronic Components
Soldering electronic components can be a fulfilling and essential skill, yet many beginners stumble due to common pitfalls. By becoming aware of these mistakes, you can enhance your soldering proficiency and achieve better results in your projects. Here are several critical errors to avoid.
Soldering Stations | Easy 60 Day Return
Not Preparing the Components Properly
Before you start soldering, ensure the components are clean and ready to go. Dirty parts can lead to weak connections. Always wipe the leads of resistors, capacitors, or any other component with isopropyl alcohol before soldering.
Using the Wrong Temperature
The temperature of your soldering iron is crucial. If it’s too low, the solder won’t flow properly, and if it’s too high, you risk damaging the components. A good rule of thumb is to use a temperature between 350°C and 400°C (around 662°F to 752°F). Adjust your iron accordingly based on the solder type you’re using.
Soldering Stations | Easy 60 Day Return
Not Tinning Your Iron
Tinning your soldering iron is a simple yet often overlooked step. It involves melting a small amount of solder on the tip of the iron before you start soldering. This creates better heat transfer and ensures a smooth soldering experience. Remember to clean your iron tip after tinning to maintain its effectiveness.
Applying Too Much or Too Little Solder
Finding the right amount of solder is essential. Using too much can result in clumpy joints, while too little can lead to fragile or unreliable connections. Aim for just enough solder to form a small, shiny, and smooth fillet around the connection point.
Soldering Stations | Easy 60 Day Return
Failing to Use Proper Technique
The technique you adopt while soldering matters greatly. Always heat both the component lead and the pad on the PCB (Printed Circuit Board) simultaneously before applying solder. This ensures the solder adheres correctly to both surfaces, forming a solid joint.
Holding the Iron Incorrectly
How you hold your soldering iron can influence your precision. Make sure to grip the iron like a pen, using your index finger to guide it. This allows for better control and steadiness while working, preventing accidental slips that could damage the board or components.
Soldering Stations | Easy 60 Day Return
Neglecting Safety Measures
Soldering can be hazardous if safety is not prioritized. Always work in a well-ventilated area as solder fumes can be harmful. Wearing safety glasses is advisable to protect your eyes from solder splashes or accidental contact with hot components.
Overheating Components
Prolonged exposure to heat can damage sensitive components. Apply heat only long enough for the solder to melt, and then remove the soldering iron. If you notice components discoloring, there’s a chance they’re getting damaged.
Soldering Stations | Easy 60 Day Return
Ignoring Solder Quality
The type of solder used can significantly impact your results. Always choose high-quality solder, preferably with a flux core. This helps to prevent oxidation during the soldering process and ensures a better bond.
Not Inspecting Your Work
After soldering, take the time to inspect your work thoroughly. Examine each joint for smoothness and shininess. A good joint will be shiny and have a “volcano” shape. Dull or grainy joints usually indicate a poor connection that needs to be reworked.
Soldering Stations | Easy 60 Day Return
Not Using a Clean Workspace
Keeping your workspace tidy is just as important as technique. A crowded or cluttered workspace can lead to mistakes and accidents. Always make sure to have enough space for your tools and materials, and clean up as you go. This will keep distractions at bay.
Disregarding Manufacturer Guides
Each component comes with specifications and guidelines from the manufacturer. Ignoring these can lead to mistakes. Before starting, read the datasheets and instructions to understand better how to handle and solder the components.
Soldering Stations | Easy 60 Day Return
By being aware of these common mistakes, you can improve your soldering skills significantly. Tackle each project with patience and attention to detail, and you’ll find that your soldering will become cleaner and more reliable over time. Happy soldering!
Conclusion
Soldering is a vital skill for anyone interested in electronics, whether you’re a hobbyist or a beginner looking to repair devices. Mastering the art of soldering with a soldering iron opens the door to countless projects and innovations. By understanding the basics, such as heating your soldering iron to the right temperature, using the correct type of solder, and keeping your tools clean, you set yourself up for success.
Equally important is learning from common mistakes that often trip up newcomers. Avoiding issues like overheating components, using too much solder, or failing to secure your work can significantly improve your results. Each misstep provides a valuable lesson, contributing to your growth as a soldering technician.
Soldering Stations | Easy 60 Day Return
Remember, practice makes perfect. The more you solder, the better you’ll understand the process and the more confident you will become. Take time to experiment with different techniques and components; this hands-on experience will deepen your skills and enhance your learning.
As you embark on your soldering journey, focus on patience and precision. Celebrate your successes and learn from your failures. Over time, you’ll find that soldering becomes not just a skill but a satisfying and enjoyable part of your electronics projects. Stick with it—every connection you make brings you a step closer to mastering the art of soldering.