Techniques for Etching Wood with a Soldering Iron
Etching wood with a soldering iron can be an exciting and creative project. This technique allows you to add personal touches to your wood items, such as furniture, crafts, or decorative pieces. With a few easy techniques, you can master the art of wood etching and create stunning designs.
The first step in etching wood with a soldering iron is selecting the right wood. Softwoods, like pine and cedar, are ideal for beginners as they are easier to burn and etch. However, if you prefer a smoother finish, hardwoods like birch or oak can work too, but they may require a steadier hand and a more experienced touch. Be sure to sand the surface of the wood before you begin. A smooth surface will help your designs stand out and make the etching process easier.
Once you have your wood prepared, gather your tools. Besides a soldering iron, you will need:
- A stand for the soldering iron
- Sandpaper (preferably 120 to 220 grit)
- Pencil or transfer paper for sketching designs
- Protective eyewear
- Heat-resistant surface or cutting board
Before you dive into etching, it’s essential to practice. Keeping a scrap piece of wood handy allows you to test different techniques and temperatures. It’s advisable to start at a low temperature and gradually increase the heat as necessary. This prevents the wood from burning too quickly, giving you greater control over your design.
Now, let’s look at some effective techniques for etching wood using a soldering iron:
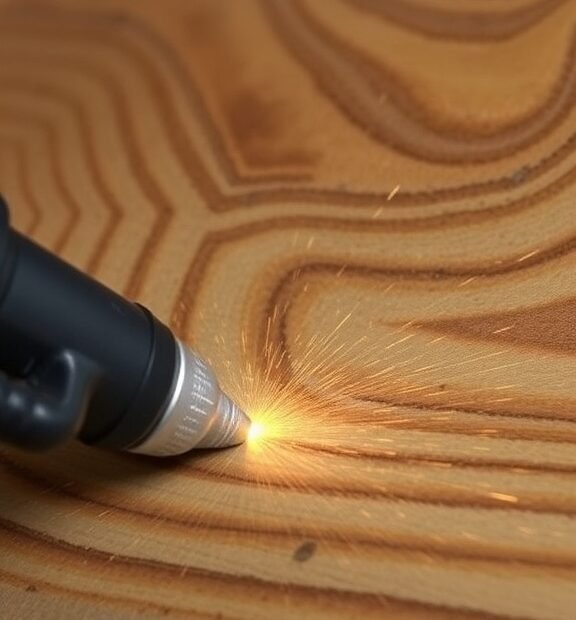
- Drawing with the Tip: Hold the soldering iron like a pencil and draw directly on the wood surface. The finer the tip of the soldering iron, the more detailed your designs can be. Start with simple shapes or lines before progressing to more intricate patterns.
- Shading Technique: For a more three-dimensional look, use varying pressure and speed. Press harder for darker lines and move more quickly for lighter marks. This technique creates depth and contrast in your etching.
- Stippling: This involves creating a series of small dots or dashes to form an image or pattern. By varying the pressure and spacing of your dots, you can achieve a range of textural effects.
- Filling in Large Areas: If you want to fill in larger sections, use the broader tip of the soldering iron. Keep the iron moving to avoid burning the wood too much and to create a consistent fill.
- Creating Textures: Try using stencils with your soldering iron. Place the stencil on the wood surface and go over it with the iron, following the openings. This will give you a clean outline that you can then fill or embellish.
Another essential tip is to take your time. Etching isn’t a race. The slower and gentler you are with the soldering iron, the better and more precise your designs will be. Allow the wood to cool after finishing each section. This will help you see how the etching appears as it cools and prevents any accidental burning.
Safety should always be a top priority. Make sure to wear protective eyewear to shield your eyes from any smoke or splinters. Work in a well-ventilated area to avoid inhaling fumes that could arise during the etching process. Keep a small bowl of water nearby for emergencies, in case the tip of the soldering iron comes into contact with flammable materials.
Once your etching is complete, consider finishing your wood piece. Applying a coat of varnish or wood sealant can protect your design and give it a polished look. This not only enhances the beauty of your work but also extends its lifespan. With these techniques, you’re ready to explore the world of wood etching using a soldering iron. With practice and creativity, you can bring your unique ideas to life on wood! Enjoy this rewarding craft and let your imagination run wild!
Safety Tips and Best Practices for Soldering Iron Wood Projects
Using a soldering iron for wood projects is an exciting way to add unique designs and personal touches to your creations. However, with creativity comes the responsibility of safety practices. Here are essential safety tips and best practices to keep in mind when you etch wood with a soldering iron.
Wear Protective Gear
One of the first steps in ensuring your safety is to wear the right protective gear. Consider the following:
- Safety Goggles: Protect your eyes from any smoke or splinters that may arise while you work.
- Heat-Resistant Gloves: These will shield your hands from accidental burns.
- Dust Mask: If you’re sanding wood before etching, wearing a mask can help protect you from inhaling fine particles.
Choose the Right Workspace
Your workspace plays a significant role in your safety. Make sure it meets these criteria:
- Ventilation: Work in a well-ventilated area to minimize exposure to fumes produced during soldering.
- Fire Safety: Have a fire extinguisher nearby, as soldering irons can cause flammable materials to ignite.
- Stable Surface: Ensure your workbench is sturdy and free of clutter to avoid accidents.
Understand Your Tools
Familiarize yourself with your soldering iron and its various attachments. Check the following:
- Temperature Settings: Different woods require different heat levels for etching. Start low and gradually increase the heat.
- Tip Selection: Use the correct tip for the design you intend to etch. Flat tips offer broad strokes, while pointed tips provide finer details.
Preparation Is Key
Before diving into your project, ensure you’re prepared. Here’s what to do:
- Choose the Right Wood: Softwoods like pine are easier to etch than hardwoods like oak. Choose a suitable type for your design.
- Practice First: If you’re new to using a soldering iron on wood, practice on a scrap piece to get the hang of the tool and its heat.
- Sketch Your Design: Lightly sketch your design on the wood before applying the soldering iron. This helps guide your etching.
Executing the Etching Technique
When you’re ready to begin etching, follow these best practices to ensure quality work:
- Have a Steady Hand: Work slowly and maintain a steady hand when moving the iron across the wood surface.
- Don’t Rush: Give the soldering iron time to transfer heat. Rushing can lead to mistakes or uneven designs.
Post-Project Care
After completing your wood etching project, proper care is essential:
- Turn Off the Iron: Always switch off and unplug your soldering iron to prevent accidents.
- Clean the Tip: Clean the soldering iron tip with a damp sponge to remove any resin or wood residue right after use, ensuring it stays in good condition.
- Store Safely: Store your soldering iron in a designated area where it can’t accidentally fall or get damaged.
Be Aware of Fire Risks
Always remain aware of fire risks when using a soldering iron:
- Never Leave It Unattended: Keep an eye on your soldering iron at all times while in use.
- Keep Away from Flammable Materials: Ensure your workspace is clear of paper, wood shavings, or cloth materials that could catch fire.
By adhering to these safety tips and best practices, you can enjoy the satisfaction of creating beautiful wood projects with your soldering iron while ensuring both your safety and the quality of your work. Happy etching!
Conclusion
Etching wood with a soldering iron can open up a world of creativity and personalization for your projects. By mastering different techniques, you can create unique designs that add character to your wooden items. Start with simple shapes and gradually move on to more complex patterns as you become comfortable with the tool. Remember to experiment with various temperatures and pressure levels to achieve the desired depth and detail in your etching.
Prioritizing safety while working with a soldering iron is equally important. Always wear protective eyewear and work in a well-ventilated area to minimize exposure to fumes. It’s wise to keep a damp cloth or sponge nearby to quickly cool the tip if needed and to ensure you have proper hand support while working on your designs. By following best practices, you not only protect yourself but also enhance the quality of your work.
Whether you’re crafting gifts, creating home décor, or personalizing tools, wood etching with a soldering iron can elevate any project. With the right techniques and safety measures, you will find this skill both enjoyable and rewarding. Dive into this creative venture with confidence. Embrace the artistry of etching and let your imagination guide you as you create beautiful wood pieces that reflect your personal style. Happy etching!