Step-by-Step Guide on How to Use Heat Shrink Tubing with a Soldering Iron
Using heat shrink tubing with a soldering iron can enhance your electrical connections, providing insulation and protection. Whether you are working on electronics projects or repairing wires, this method is incredibly effective. Below, find a straightforward step-by-step guide to help you navigate through the process smoothly.
Gather Your Materials
Before starting, make sure you have the following tools and materials:
- Heat shrink tubing of the correct diameter
- Soldering iron
- Solder
- Wire cutters/strippers
- Heat gun or lighter (optional)
- Protective gear (gloves, goggles)
Prepare the Wires
The first step is to prepare the wires you plan to connect. Follow these steps:
- Strip the Wire: Use wire strippers to remove about ¼ inch of insulation from the ends of both wires. This exposes the metal for soldering.
- Twist the Wires Together: If you are connecting two solid wires, twist them tightly to ensure a good electrical connection.
Insert the Heat Shrink Tubing
Once your wires are prepared, it’s time to apply the heat shrink tubing:
- Cut the Tubing: Cut a piece of heat shrink tubing that is long enough to cover the soldered area fully. A good rule of thumb is to make it about 1 to 2 inches long.
- Slide the Tubing On: Prior to soldering, slide the heat shrink tubing onto one of the wires. Ensure that it is positioned far enough away from the area where you’ll be applying heat.
Solder the Wires Together
Now, it’s time to solder the wires:
- Heat the Soldering Iron: Plug in your soldering iron and let it heat up to the appropriate temperature, usually around 350°C (662°F).
- Apply the Solder: Place a small amount of solder on the exposed wire ends. Heat the wires with the soldering iron until the solder melts and fills the connection. Remove the soldering iron and allow the joint to cool for a moment.
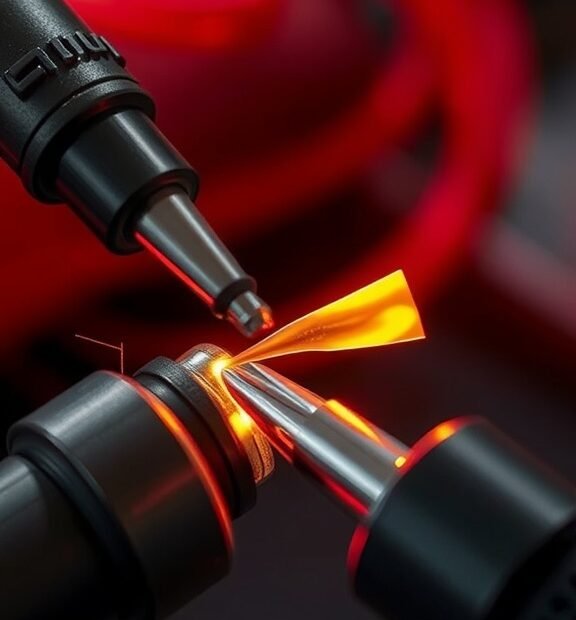
Heat Shrink the Tubing
With the wires soldered, it’s time to shrink the tubing:
- Position the Tubing: Move the heat shrink tubing over the soldered joint carefully, ensuring it covers the entire connection.
- Apply Heat: Using either a heat gun or a lighter, evenly distribute the heat over the tubing. If using a lighter, keep it at a distance to avoid burning the tubing. Rotate the tubing as you heat to ensure it shrinks uniformly.
Final Checks
Once the heat shrink tubing has fully shrunk and encased the solder joint, allow it to cool for a few moments. Here are the final checks you should perform:
- Ensure there are no gaps in the tubing, which could expose the wires.
- Check that the tubing is tightly sealed around the solder joint.
- Test the connection with a multimeter to confirm there are no short circuits or connectivity issues.
Safety Tips
Remember to prioritize safety throughout the process. Here are some helpful safety tips:
- Always wear gloves and goggles to protect yourself from heat and solder splashes.
- Work in a well-ventilated area to avoid inhaling fumes released during soldering.
- Keep flammable materials away from your work area when using a lighter or heat gun.
By following these steps, you can successfully use heat shrink tubing with a soldering iron. This method not only strengthens your connections but also provides excellent insulation to prevent short circuits. Now you can enjoy a secure and clean electrical project with confidence!
Common Mistakes to Avoid When Applying Heat Shrink Tubing
Applying heat shrink tubing correctly can make a significant difference in the durability and functionality of your projects. However, there are some common mistakes that many people unknowingly make. Here’s a comprehensive guide to help you avoid these pitfalls, ensuring your heat shrink tubing works as intended.
Choosing the Wrong Size of Heat Shrink Tubing
One of the most frequent mistakes is selecting heat shrink tubing that is either too large or too small for the application. It’s crucial to measure the diameter of the wire or component accurately before making a purchase. If the tubing is too small, it won’t fit over the connection. If it’s too large, it won’t provide enough support, potentially leading to exposure to moisture and debris.
Neglecting to Prepare the Surface
Before applying heat shrink tubing, you must properly prepare the surface of the wires or components. Dirt, grease, or moisture can prevent a secure bond, leading to future issues. Make sure to clean the areas thoroughly and, if necessary, use alcohol wipes to ensure that the surface is completely free of contaminants.
Forgetting to Use a Heat Source Carefully
While a soldering iron is effective for melting the tubing, it’s important to use it correctly. Many people make the mistake of applying too much heat or holding the iron too close. This can cause the tubing to melt unevenly or even burn. Use a gentle heating technique, moving the iron in a circular motion to evenly distribute heat.
Skipping the Pre-Cut Tubing Step
Another common oversight is skipping the pre-cut step. Applying heat shrink tubing directly from the roll leads to uneven lengths and wastage. Always cut the tubing to the desired length before using it. This not only saves material but also ensures that you have full control over the amount of tubing being applied.
Not Allowing Enough Space
When applying heat shrink tubing, it’s essential to leave space for the wire connectors. If the tubing is applied too tightly against the connector, it can restrict movement and create unnecessary tension. Always ensure there’s some room for flexibility, as this can prevent damage during routine use.
Ignoring the Shrink Ratio
Heat shrink tubing comes in different shrink ratios. A common error is ignoring this aspect, which can lead to ineffective insulation. Understanding the shrink ratio helps you choose the right tubing for your project. If you are not familiar with shrink ratios, look for tubing that shrinks by at least 2:1, which means it can reduce to half its original diameter.
Using an Inappropriate Type of Heat Shrink Tubing
Heat shrink tubing is available in various materials and colors, each suited for different environments. Some types resist moisture better than others or can withstand higher temperatures. Not choosing the appropriate type can lead to premature failure of the tubing. Therefore, consider the application environment—whether it’s exposed to fluids or extreme temperatures—before making your selection.
Neglecting to Test After Application
After you’ve applied heat shrink tubing, it’s tempting to move on to the next step without testing. This omission can lead to surprise failures later on. Make it a habit to test the connection after applying the tubing to ensure everything is secure and functioning correctly. This simple step can save you a lot of time and hassle down the road.
Rushing the Process
One of the biggest mistakes is rushing through the application of heat shrink tubing. Taking your time can ensure that each step is executed properly, reducing the chances of error. Make sure that you take the time to measure, cut, clean, and apply the tubing with care.
By avoiding these common mistakes, you can enhance the quality and longevity of your projects that involve heat shrink tubing. Each step is crucial to ensure that you achieve the best possible result. Remember to focus on preparation, careful application, and testing to make the most of this versatile material.
Conclusion
Using heat shrink tubing with a soldering iron is a straightforward and effective way to strengthen and protect your electrical connections. By following a step-by-step guide, you can ensure a tight fit and a long-lasting bond. Remember to prepare your wires properly and ensure everything is clean and dry before applying the tubing. This attention to detail will significantly enhance the quality of your work.
It’s equally important to recognize common mistakes that can occur during this process. Many people underestimate the heat required or may apply the soldering iron for too long, which can damage the tubing or the wire itself. Avoid these pitfalls by keeping your soldering iron at the correct temperature and applying heat gradually. Always allow adequate cooling time to ensure a secure bond.
By mastering these techniques and avoiding common errors, you can achieve professional-level results in your electrical projects. Whether you’re repairing a wire or creating a custom connection, heat shrink tubing combined with a soldering iron offers durability and reliability. This method not only enhances the stability of your connections but also protects them from elements such as moisture and abrasion.
Embrace this simple yet powerful technique, and you’ll be well on your way to elevating your electrical work. Happy wiring! Your projects will thank you for the extra effort.