Can a soldering iron effectively melt glass for crafting purposes?
If you’re into crafting, you may have wondered whether a soldering iron can be used to melt glass. This question brings excitement and curiosity, especially if you’re looking to experiment with new techniques in your projects. Understanding the capabilities of a soldering iron can broaden your creative options. So, let’s explore the details of using a soldering iron for melting glass and what you need to know before diving in.
A soldering iron is generally designed for melting solder, a metal alloy used predominantly in electronics. The standard operating temperature for most soldering irons ranges from 350°F (about 180°C) to 850°F (about 450°C). However, glass melting requires much higher temperatures, often reaching 1,500°F (about 815°C) for soft glass types. Therefore, a typical soldering iron likely won’t reach the necessary temperatures to fully melt glass.
That said, while soldering irons can’t melt glass in the conventional sense, they can be used effectively to work with glass in a few innovative ways:
- Adhering Glass Pieces: If you’re looking to join small pieces of glass, a soldering iron can help melt certain glass adhesives. This approach requires glass-compatible adhesives that can bond the pieces when heated.
- Creating Texture: By gently heating the surface of the glass, a soldering iron can create interesting textures or effects. It allows for a bit of manipulation in design but requires careful handling to avoid breaking the glass.
- Fusing Glass Rods: For stained glass projects, you can use a soldering iron to fuse small glass rods together. The iron can create small soft spots where melted glass can adhere to one another, offering a creative approach to glass crafting.
It’s important to remember that using a soldering iron on glass is far different from traditional glass melting methods. A glass kiln is typically used for serious glass melting or fusing. These kilns maintain stable, high temperatures required to melt glass evenly without thermal shock, which is crucial for the success of glassworking projects. If you aim for quality in your glass crafting, investing in a kiln specifically designed for glass melting could be the best route.
Should you decide to experiment with a soldering iron, safety is of utmost importance. Here are a few tips to keep in mind:
- Wear Protective Gear: Always wear safety goggles and heat-resistant gloves. This protects you from potential injuries caused by hot glass pieces or adhesive fumes.
- Ventilation: Ensure your workspace is well-ventilated, especially if you are using adhesives that can release harmful fumes when heated.
- Test Small Areas: Before applying heat to a larger area, it’s best to test your approach on small, scrap pieces of glass. This practice allows you to get accustomed to temperature control and see how materials react without risking your main project.
To maximize your creativity while using a soldering iron, consider combining techniques such as stained glass assembly with soldered metal frames. This method can yield fantastic results that add dimension and beauty to your work without needing to melt the glass entirely.
Although a soldering iron is a handy tool in crafting, using it for melting glass should be approached with caution. The results may not always meet your expectations due to limited available temperature ranges. However, if your intention lies more in manipulating glass rather than melting it outright, then a soldering iron can be a valuable tool in your arsenal.
Ultimately, understanding the capabilities and limitations of your tools leads to better artistic outcomes. Whether you’re a novice or an experienced crafter, knowing how to work with a soldering iron opens the door to exciting projects. Test your creativity, follow safety protocols, and enjoy the art of glass crafting with the tools at your disposal!
Alternatives to soldering irons: Tools and techniques for glass melting
When it comes to melting glass, many may immediately think of a soldering iron. However, there are multiple tools and techniques that can serve as effective alternatives for a variety of projects. Understanding these options can not only broaden your skills but also allow for more creative freedom in your glass-related endeavors.
Heat Gun
A heat gun is a popular choice for melting glass. This tool emits a powerful stream of hot air, which can easily reach temperatures necessary for softening glass. With various temperature settings, you can adjust the heat output according to the type and thickness of the glass you’re working with.
- Pros: It’s excellent for controlled heating, allowing you to focus on specific areas of your glass piece.
- Cons: It might take longer to heat larger pieces compared to more direct heating methods.
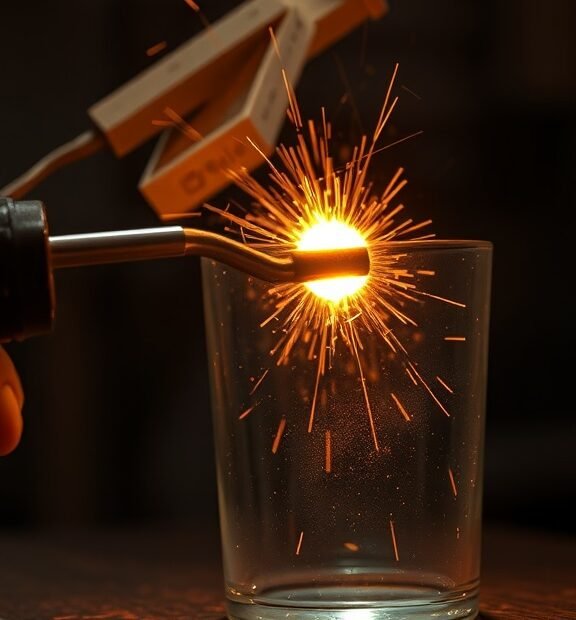
Blow Torch
If you’re seeking something more intense, a blowtorch could be the tool for you. This flame-producing tool is very effective for quickly melting glass, especially in smaller sections. It’s commonly used in glassblowing and can create intricate designs due to the precise control it offers.
- Pros: Provides instant heat and versatility for both melting and shaping the glass.
- Cons: Should be used with caution, as it generates very high temperatures that can pose safety risks.
Kiln
A kiln is the go-to option for those who want to melt and fuse glass pieces with precision and perfection. Often used in glass art and ceramics, a kiln can reach desired temperatures steadily over time, leading to beautiful and consistent results.
- Pros: Ideal for large projects and allows for even heating, minimizing the risk of glass stress and breakage.
- Cons: Kilns can be expensive and may require more setup time than handheld tools.
Electric Glass Melting Furnace
This specialized equipment is great for glass artists who want to melt large amounts of glass. Designed specifically for this purpose, an electric glass melting furnace can easily regulate temperatures and has a chamber specifically built to accommodate various glass sizes.
- Pros: High capacity and excellent temperature control, making it perfect for intricate glass projects.
- Cons: These furnaces can require a significant investment and may take longer to reach operating temperatures.
Combining Techniques
Sometimes the best results come from combining different techniques. For instance, using a heat gun for localized melting and then transferring the piece to a kiln for a final fusing process can yield impressive results. This hybrid approach allows for creative flexibility and enhanced detail.
Safety Considerations
No matter which alternative tool you choose, safety should always be your first priority. Wear protective gear, including gloves and safety goggles, and ensure you are working in a well-ventilated area. Be mindful of the temperatures you’re working with to prevent burns or other injuries.
Final Thoughts
Finding the right tool for melting glass can open up new creative possibilities in your projects. While soldering irons can certainly have their place, exploring a range of alternatives will elevate your craftsmanship. Whether opting for a heat gun, blow torch, kiln, or electric glass melting furnace, each tool brings its unique advantages and challenges. The key is to understand the requirements of your specific project and choose the method that best fits those needs.
Diversifying your toolkit will not only enhance your effectiveness in glass melting but also inspire more innovative approaches to your art. So grab your tools, stay safe, and start melting!
Conclusion
When considering the use of a soldering iron for melting glass, it’s important to weigh its effectiveness. While a soldering iron can indeed melt glass, particularly thin pieces, it is not the most efficient tool for larger projects or for crafting purposes that require precision and depth. The limited temperature range of soldering irons might not provide the necessary heat required for certain types of glasswork, leading to inconsistent results.
For those passionate about glass crafting, exploring alternatives like kilns or specialized glass blowers can significantly enhance your creative projects. These tools are designed specifically for working with glass and can achieve the higher temperatures needed to melt various types of glass evenly. Torch-based methods, like using a butane torch or propane torch, are also great substitutes that offer the versatility and control needed for detailed glasswork.
Ultimately, the choice of tool depends on your specific crafting goals. If you enjoy small DIY projects and plan to use thinner glass, a soldering iron may suffice. However, if your aspirations lie within larger scale or intricate designs, investing in specialized glass-melting tools will provide better outcomes and a more enjoyable crafting experience.
Explore your options and match the right tools to your goals. With the right approach, you can unlock a world of possibilities in glass crafting, allowing your artistic vision to come to life. So whether you choose to stick with a soldering iron or venture into the realm of dedicated glassworking tools, happy crafting!